🔧 Модуль 1 — Базовая настройка
ISP
hostnamectl set-hostname isp; exec bash
mkdir /etc/net/ifaces/enp7s2
mkdir /etc/net/ifaces/enp7s3
mim /etc/net/ifaces/enp7s2/options
TYPE=eth
BOOTPROTO=static
vim /etc/net/ifaces/enp7s3/options
TYPE=eth
BOOTPROTO=static
echo “172.16.1.1/28” > /etc/net/ifaces/enp7s2/ipv4address
echo “172.16.2.1/28” > /etc/net/ifaces/enp7s3/ipv4address
vim /etc/net/sysctl.conf
1
systemctl restart network
apt-get update && apt-get install tzdata -y && apt-get install iptables -y
iptables -t nat -A POSTROUTING -o enp7s1 -j MASQUERADE
iptables-save >> /etc/sysconfig/iptables
systemctl enable --now iptables
timedatectl set-timezone Asia/Yekaterinburg
BR-RTR
hostnamectl set-hostname br-rtr.au-team.irpo; exec bash
vim /etc/net/ifaces/enp7s1/options
# Заменить BOOTPROTO=static
vim /etc/net/ifaces/enp7s1/ipv4address
172.16.2.14/28
vim /etc/net/ifaces/enp7s1/ipv4route
default via 172.16.2.1
mkdir /etc/net/ifaces/enp7s2
vim /etc/net/ifaces/enp7s2/options
TYPE=eth
BOOTPROTO=static
vim /etc/net/ifaces/enp7s2/ipv4address
192.168.200.1/28
echo “nameserver 77.88.8.8” > /etc/resolv.conf
vim /etc/net/sysctl.conf
1
mkdir /etc/net/ifaces/gre1
vim /etc/net/ifaces/gre1/options
TYPE=iptun
TUNTYPE=gre
TUNLOCAL=172.16.2.14
TUNREMOTE=172.16.1.14
TUNOPTIONS=’ttl 64’
HOST=enp7s1
echo “10.10.10.2/30” > /etc/net/ifaces/gre1/ipv4address
systemctl restart network
echo “gre” | tee -a /etc/modules
useradd net_admin
Passwd net_admin
P@ssw0rd
P@ssw0rd
usermod -aG wheel net_admin
echo “net_admin ALL=(ALL:ALL) NOPASSWD:ALL” >> /etc/sudoers
apt-get update && apt-get install iptables -y && apt-get install tzdata -y && apt-get install frr -y
timedatectl set-timezone Asia/Yekaterinburg
iptables -t nat -A POSTROUTING -o enp7s1 -j MASQUERADE
iptables-save >> /etc/sysconfig/iptables
systemctl enable --now iptables

vim /etc/frr/daemons
Ospfd=yes
systemctl enable --now frr
vtysh
Conf t
router ospf
Passive-interface default
Net 10.10.10.0/30 a 0
Net 192.168.200.0/28 a 0
Ex
int gre1
no ip ospf passive
ip ospf authentication message-digest
ip ospf message-digest 1 md5 P@ssw0rd
end
wr mem
exit
BR-SRV
Hostnamectl set-hostname br-srv.au-team.irpo; exec bash
ip -c a
vim /etc/net/ifaces/enp7s1/options
# Заменить BOOTPROTO=static SYSTEMD_BOOTPROTO=static
vim /etc/net/ifaces/enp7s1/ipv4address
192.168.200.2/28
vim /etc/net/ifaces/enp7s1/ipv4route
default via 192.168.200.1
vim /etc/resolv.conf
nameserver 77.88.8.8
vim /etc/net/sysctl.conf
1
systemctl restart network
ip -c a
useradd sshuser -u 2026
passwd sshuser
P@ssw0rd
P@ssw0rd
usermod -aG wheel sshuser
echo “sshuser ALL=(ALL:ALL) NOPASSWD:ALL” >> /etc/sudoers
vim /etc/openssh/sshd_config
Port 2026
AllowUsers sshuser
MaxAuthTries 2
Banner /etc/openssh/banner
echo “authorized access only” > /etc/openssh/banner
systemctl restart sshd
apt-get update && apt-get install tzdata -y
timedatectl set-timezone Asia/Yekaterinburg
HQ-RTR
Hostnamectl set-hostname hq-rtr.au-team.irpo; exec bash
ip -c a
vim /etc/net/ifaces/enp7s1/options
TYPE=eth
BOOTPROTO=static
vim /etc/net/ifaces/enp7s1/ipv4address
172.16.1.14/28
vim /etc/net/ifaces/enp7s1/ipv4route
default via 172.16.1.1
echo “nameserver 77.88.8.8” > /etc/resolv.conf
vim /etc/net/sysctl.conf
1
systemctl restart network
useradd net_admin
passwd net_admin
P@ssw0rd
P@ssw0rd
usermod -aG wheel net_admin
echo “net_admin ALL=(ALL:ALL) NOPASSWD:ALL” >> /etc/sudoers
apt-get update && apt-get install tzdata -y && apt-get install iptables -y && apt-get install frr -y && apt-get install openvswitch -y && apt-get install dhcp-server -y
timedatectl set-timezone Asia/Yekaterinburg
iptables -t nat -A POSTROUTING -o enp7s1 -j MASQUERADE
iptables-save >> /etc/sysconfig/iptables
systemctl enable --now iptables

# Open vSwitch + VLAN
mkdir /etc/net/ifaces/enp7s2
vim /etc/net/ifaces/enp7s2/options
TYPE=eth
BOOTPROTO=static
mkdir /etc/net/ifaces/vlan100
mkdir /etc/net/ifaces/vlan200
mkdir /etc/net/ifaces/vlan999
mkdir /etc/net/ifaces/HQ-SW
vim /etc/net/ifaces/vlan100/options
TYPE=ovsport
BRIDGE=HQ-SW
VID=100
BOOTPROTO=static
CONFIG_IPV4=yes
cp /etc/net/ifaces/vlan100/options /etc/net/ifaces/vlan200/
vim /etc/net/ifaces/vlan200/options
TYPE=ovsport
BRIDGE=HQ-SW
VID=200
BOOTPROTO=static
CONFIG_IPV4=yes
vim /etc/net/ifaces/vlan999/options
TYPE=ovsport
BRIDGE=HQ-SW
VID=999
BOOTPROTO=static
CONFIG_IPV4=yes
echo “192.168.100.1/27” > /etc/net/ifaces/vlan100/ipv4address
echo “192.168.20.1/24” > /etc/net/ifaces/vlan200/ipv4address
echo “192.168.99.1/29” > /etc/net/ifaces/vlan999/ipv4address
vim /etc/net/ifaces/HQ-SW/options
TYPE=ovsbr
systemctl enable --now openvswitch
modprobe 8021q
echo “8021q” | tee -a /etc/modules
systemctl restart network
ovs-vsctl add-port HQ-SW enp7s2 trunks=100,200,999

# GRE + OSPF + DHCP (полные команды из вашего текста)
mkdir /etc/net/ifaces/gre1
vim /etc/net/ifaces/gre1/options
TYPE=iptun
TUNTYPE=gre
TUNLOCAL=172.16.1.14
TUNREMOTE=172.16.2.14
TUNOPTIONS=’ttl 64’
HOST=enp7s1
echo “10.10.10.1/30” > /etc/net/ifaces/gre1/ipv4address
systemctl restart network
echo “gre” | tee -a /etc/modules
vim /etc/frr/daemons
Ospfd=yes
systemctl enable --now frr
vtysh
Conf t
router ospf
Passive-interface default
Net 10.10.10.0/30 a 0
Net 192.168.100.0/27 a 0
Net 192.168.20.0/24 a 0
Net 192.168.99.0/29 a 0
ex
int gre1
no ip ospf passive
ip ospf authentication message-digest
ip ospf message-digest-key 1 md5 P@ssw0rd
end
wr mem
exit
vim /etc/sysconfig/dhcpd
DHCPDARGS=’vlan200’
vim /etc/dhcp/dhcpd.conf
option domain-name “au-team.irpo”;
option domain-name-servers 192.168.100.2;
default-lease-time 6000;
max-lease-time 72000;
authoritative;
subnet 192.168.20.0 netmask 255.255.255.0 {
range 192.168.20.2 192.168.20.254;
option routers 192.168.20.1;
}
systemctl enable --now dhcpd
HQ-SRV
hostnamectl set-hostname hq-srv.au-team.irpo; exec bash
mkdir /etc/net/ifaces/enp7s1.100
vim /etc/net/ifaces/enp7s1.100/options
TYPE=vlan
HOST=enp7s1
VID=100
BOOTPROTO=static
echo “192.168.100.2/27” > /etc/net/ifaces/enp7s1.100/ipv4address
echo “default via 192.168.100.1” > /etc/net/ifaces/enp7s1.100/ipv4route
echo “nameserver 77.88.8.8” > /etc/resolv.conf
useradd sshuser -u 2026
Passwd sshuser
P@ssw0rd
P@ssw0rd
usermod -aG wheel sshuser
echo “sshuser ALL=(ALL:ALL) NOPASSWD:ALL” >> /etc/sudoers
vim /etc/net/sysctl.conf
1
systemctl restart network
apt-get update && apt-get install tzdata -y && apt-get install dnsmasq -y
vim /etc/dnsmasq.conf
no-hosts
server=77.88.8.8
cache-size=1000
all-servers
no-negcache
interface=*
host-record=hq-rtr.au-team.irpo,192.168.100.1
host-record=hq-rtr.au-team.irpo,192.168.20.1
host-record=hq-rtr.au-team.irpo,192.168.99.1
host-record=hq-srv.au-team.irpo,192.168.100.2
host-record=hq-cli.au-team.irpo,192.168.20.2
address=/br-rtr.au-team.irpo/192.168.200.1
address=/br-srv.au-team.irpo/192.168.200.2
address=/docker.au-team.irpo/172.16.1.1
address=/web.au-team.irpo/172.16.2.1
systemctl enable --now dnsmasq.service
vim /etc/openssh/sshd_config
Port 2026
AllowUsers sshuser
MaxAuthTries 2
Banner /etc/openssh/banner
echo “Authorized access only” >> /etc/openssh/banner
systemctl restart sshd
timedatectl set-timezone Asia/Yekaterinburg
HQ-CLI
Hostnamectl set-hostname hq-cli.au-team.irpo;exec bash
vim /etc/net/ifaces/enp7s1/options
BOOTPROTO=dhcp
TYPE=eth
NM_CINTROLLED=no
DISABLED=no
CONFIG_IPV4=no
mkdir /etc/net/ifaces/enp7s1.200
vim /etc/net/ifaces/enp7s1.200/options
TYPE=vlan
BOOTPROTO=dhcp
DISABLED=no
VID=200
HOST=enp7s1
NM_CONTROLLED=no
CONFIG_IPV4=yes
vim /etc/net/sysctl.conf
1
systemctl restart network
apt-get update && apt-get install tzdata -y
timedatectl set-timezone Asia/Yekaterinburg
🌐 Модуль 2 — Сервисы и интеграция
ISP (NTP + Nginx)
apt-get update && apt-get install iptables -y
iptables -t nat -A POSTROUTING -o enp7s1 -j MASQUERADE
iptables-save >> /etc/sysconfig/iptables
vim /etc/net/sysctl.conf
1
systemctl restart network
vim /etc/chrony.conf
Server ntp0.ntp-servers.net iburst prefer minstratum 4
Local stratum 5
Allow 0.0.0.0/0
systemctl restart chronyd
apt-get install curl -y && apt-get install apache2-htpasswd && Apt-get install nginx -y
BR-SRV (Samba AD)
vim /etc/net/sysctl.conf
	1
echo “nameserver 77.88.8.8” >> /etc/net/ifaces/enp7s1/resolv.conf
systemctl restart network
ip -c -br -4 a
systemctl restart network
vim /etc/chrony.conf
#pool
	Server 172.16.2.1 iburst
systemctl restart chronyd
apt-get update && apt-get install task-samba-dc -y
rm -f /etc/samba/smb.conf
rm -rf /var/lib/samba/
rm -rf /var/cache/samba/
mkdir -p /var/lib/samba/sysvol
samba-tool domain provision
	везде пробел
	P@ssw0rd
	P@ssw0rd
cp /var/lib/samba/private/krb5.conf /etc/krb5.conf
systemctl enable –now samba.service
echo "search au-team.irpo" > /etc/net/ifaces/enp7s1/resolv.conf
echo "nameserver 127.0.0.1" >> /etc/net/ifaces/enp7s1/resolv.conf
systemctl restart network
samba-tool domain info 127.0.0.1
kinit Administrator@AU-TEAM.IRPO
	P@ssw0rd
klist
Samba-tool group add hq
for i in {1..5}; do samba-tool user add hquser$i P@ssw0rd; samba-tool user setexpiry hquser$i --noexpiry; samba-tool group addmembers "hq" hquser$i; done
samba-tool group listmembers hq
apt-get install ansible sshpass -y && apt-get install docker-engine docker-compose-v2 -y
HQ-CLI
В терминале:
vim /etc/chrony.conf
#pool
	Server 172.16.1.1 iburst
systemctl restart chronyd
cat /etc/resolv.conf
host au-team.irpo
apt-get update && apt-get install -y task-auth-ad-sssd
Заходим в Центр управления системой – в пользователи Аутентификация
Домен Active Directory
Применить
P@ssw0rd
Ок
перезагрузить
В терминале:
Su –
roleadd hq wheel
echo "Cmnd_Alias SHELLCMD = /bin/cat, /bin/grep, /usr/bin/id" > /etc/sudoers.d/hq
echo "WHEEL_USERS ALL=(ALL: ALL) SHELLCMD" >> /etc/sudoers.d/hq
exit
sudo id
sado cat /etc/hosts
sudo ip a


su -
apt-get install nfs-clients -y
mkdir /mnt/nfs
chmod -R 777 /mnt/nfs
vim /etc/fstab
	192.168.1.10:/raid/nfs		/mnt/nfs	nfs	defaults	0	0
mount -av
df -h
echo "Hello" > /mnt/nfs/test.txt
cat /mnt/nfs/test.txt
HQ-CLI и на RTR ( и пароли поменять) Systemctl enable –-now sshd
и на HQ-SRV в vim /etc/openssh/sshd_config Port 2026

su –
echo “172.16.1.1 web.au-team.irpo” >> /etc/hosts
echo “172.16.2.1 docker.au-team.irpo” >> /etc/hosts
Проверить
apt-get install yandex-browser-stable -y
HQ-SRV
vim /etc/chrony.conf
#pool
	Server 172.16.1.1 iburst
systemctl restart chronyd
apt-get update && apt-get install mdadm -y && Apt-get install nfs-server -y
mdadm --create /dev/md0 -l 0 -n 2 /dev/sdb /dev/sdc
mdadm -–detail –-scan --verbose | tee -a /etc/mdadm.conf
mkfs.ext4 /dev/md0
vim /etc/fstab
	/dev/md0	/raid	ext4	defaults		0	0
mkdir /raid
mount -av
lsblk
mkdir /raid/nfs
chmod -R 777 /raid/nfs
vim /etc/exports
	/raid/nfs 192.168.2.10/28(rw,no_root_squash)
exportfs -arv
systemctl enable –now nfs-server.service
apt-get update && apt-get install lamp-server -y


mount /dev/sr0 /mnt/
cp /mnt/web/index.php /var/www/html/
cp /mnt/web/logo.png /var/www/html/
vim /var/www/html/index.php
	Username = “webc”
	Password = “P@ssw0rd”
	dbname = “webdb”
systemctl enable –now mariadb
mariadb -u root
	CREATE DATABASE webdb;
	CREATE USER ‘webc’@’localhost’ IDENTIFIED BY ‘P@ssw0rd’;
	GRANT ALL PRIVILEGES ON webdb.* TO ‘webc’@’localhost’ WITH GRANT OPTION;
	EXIT;
mariadb -u webc -p -D webdb < /mnt/web/dump.sql
	P@ssw0rd
systemctl enable –now httpd2.service

На hq-cli
http://192.168.3.10:8080
http://192.168.1.10:8080
BR-SRV
vim /etc/ansible/ansible.cfg
	Расскоментируем invenroty
	Host_key_checking = False
vim /etc/ansible/hosts
	BR-RTR ansible_ssh_host=192.168.3.1 ansible_ssh_user=net_admin ansible_ssh_pass=P@ssw0rd
	HQ-RTR ansible_ssh_host=192.168.1.1 ansible_ssh_user=net_admin ansible_ssh_pass=P@ssw0rd
	HQ-SRV ansible_ssh_host=192.168.1.10 ansible_ssh_user=sshuser ansible_ssh_pass=P@ssw0rd ansible_port=2026
	HQ-CLI ansible_ssh_host=192.168.2.10 ansible_ssh_user=user ansible_ssh_pass=resu
	[all:vars]
	Ansible_python_interpreter=/usr/bin/python3
Ansible -m ping all


systemctl enable –now docker.service
mount /dev/sr0  /mnt/
docker load < /mnt/docker/site_latest.tar
docker load <  /mnt/docker/mariadb_latest.tar
docker image ls
vim compose.yaml


Docker compose up -d
Docker compose ps
Docker compose up -d
Docker compose ps
HQ-rtr
iptables -t nat -A PREROUTING -i enp7s1 -p tcp –-dport 2026 -j DNAT -–to-destination 192.168.1.10:2026
iptables -t nat -A PREROUTING -I enp7s1 -p tcp –-dport 8080 -j DNAT –-to-destination 192.168.1.10
iptables-save >> /etc/sysconfig/iptables
iptables -t nat -L -n -v
BR-RTR
iptables -t nat -A PREROUTING -i enp7s1 -p tcp –-dport 2026 -j DNAT –-to-destination 192.168.3.10:2026
iptables -t nat -A PREROUTING -I enp7s1 -p tcp –-dport 8080 -j DNAT –-to-destination 192.168.3.10
iptables-save >> /etc/sysconfig/iptables
iptables -t nat -L -n -v
ISP — Финальная настройка Nginx
ssh -p 2026 sshuser@172.16.1.2
ssh -p 2026 sshuser@172.16.2.2
curl http://172.16.1.2:8080 | head
curl http://172.16.2.2:8080 | head
htpasswd -c /etc/nginx/.htpasswd WEB
	P@ssw0rd
	P@ssw0rd

vim /etc/nginx/sites-available.d/default.conf

	Server {
	        Listen 80;
	        Server_name web.au-team.irpo;
	        Location / {
		         Proxy_pass http://172.16.1.2:8080;
		         Auth_basic “Restricted area”;
		         Auth_basic_user_file /etc/nginx/.htpasswd;
               }
}

Server {
       Listen 80;
       Server_name docker.au-team.irpo;
       Location / {
              Proxy_pass http://172.16.2.2:8080;
       }
}

ln -s /etc/nginx/sites-available.d/default.conf /etc/nginx/sites-enabled.d/
Systemctl enable –now nginx
📋 Модуль 3 — Расширенные сервисы
Задание 1: импорт пользователей BR-SRV
apt-get update && apt-get install -y dos2unix curl
mount /dev/sr0 /mnt
cp /mnt/Users.csv /opt/
curl -o /opt/import_users.sh https://raw.githubusercontent.com/DenTret/demo2026/refs/heads/main/import_users.sh
ls /opt
dos2unix /opt/import_users.sh
chmod +x /opt/import_users.sh
Необходимо выдать права root
mcedit /etc/sudoers
/opt/import_users.sh
2 Вариант настройки
mount /dev/sr0 /mnt/
wc -l /mnt/Users.csv
head -n1 /mnt/Users.csv
head -n1 /mnt/Users.csv | tr -cd ‘;’ | wc -c | awk ‘{print $1+1}’
awk -F ‘;’ ‘NR>1 {print $5}’ /mnt/Users.csv | sort | uniq
vim import_user.sh
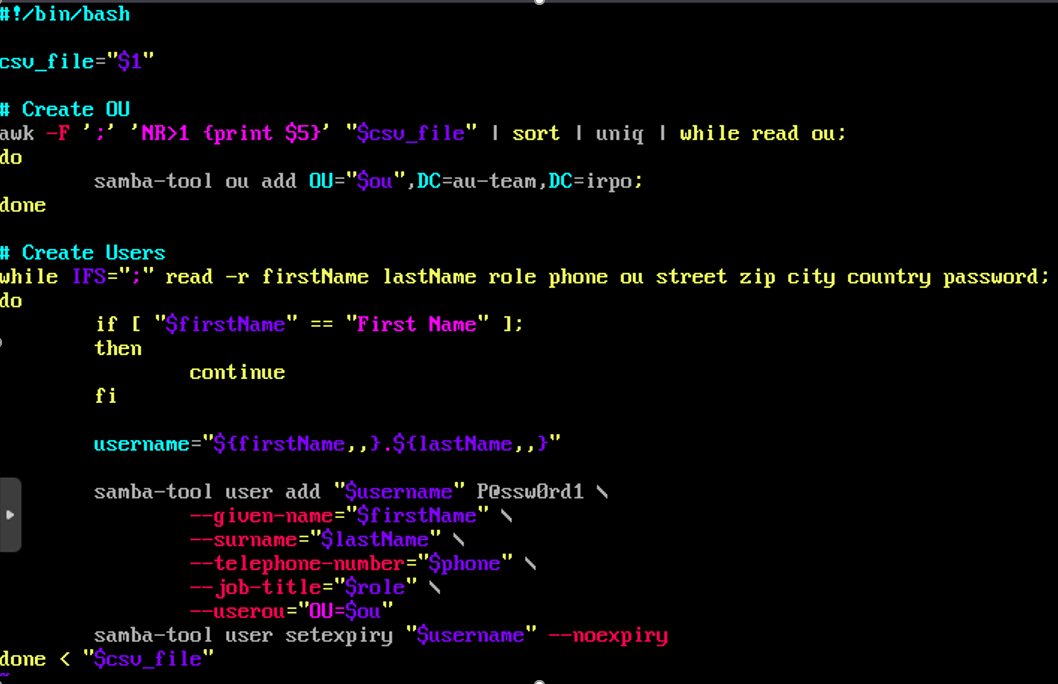 chmod +x import_user.sh
./import_user.sh /mnt/Users.csv
samba-tool ou list
samba-tool ou listobjects OU=IT
samba-tool ou listobjects OU=Overal
samba-tool ou listobjects OU=Manager
samba-tool ou listobjects OU=Supporter | wc -l
samba-tool ou listobjects OU=Cloud\ storage | wc -l
chmod +x import_user.sh
./import_user.sh /mnt/Users.csv
samba-tool ou list
samba-tool ou listobjects OU=IT
samba-tool ou listobjects OU=Overal
samba-tool ou listobjects OU=Manager
samba-tool ou listobjects OU=Supporter | wc -l
samba-tool ou listobjects OU=Cloud\ storage | wc -l
Задание 2: настройка центра сертификации HQ-SRV
HQ-SRV
apt-get install -y openssl-gost-engine
control openssl-gost enabled
openssl genpkey -algorithm gost2012_256 -pkeyopt paramset:TCB -out ca.key
openssl req -new -x509 -md_gost12_256 -days 30 -key ca.key -out ca.cer
Country Name (2 letter code) [RU]:
State or Province Name (full name) [1:.
Locality Name (eg, city) []:.
Organization Name (eg, company) []:au-team.irpo
Organizational Unit Name (eg, section) [1:.
Common Name (e.g. server FQDN or YOUR name) []:hq-srv.au-team.irpo
Email Address []:
openssl x509 -noout -text -in ca.cer
openssl genpkey -algorithm gost2012_256 -pkeyopt paramset:A -out web.au-team.irpo.key
openssl genpkey -algorithm gost2012_256 -pkeyopt paramset:A -out docker.au-team.irpo.key
Создаём запросы на подпись в ранее созданом УЦ:

openssl req -new  -md_gost12_256 -key web.au-team.irpo.key -out web.au-team.irpo.csr
Country Name (2 letter code) [RU]:
State or Province Name (full name) [1:.
Locality Name (eg, city) []:.
Organization Name (eg, company) []:au-team.irpo
Organizational Unit Name (eg, section) [1:.
Common Name (e.g. server FQDN or YOUR name) []:web.au-team.irpo
Email Address []:
Аналогино делаем для docker.au-team.irpo

openssl req -new  -md_gost12_256 -key docker.au-team.irpo.key -out docker.au-team.irpo.csr
Country Name (2 letter code) [RU]:
State or Province Name (full name) [1:.
Locality Name (eg, city) []:.
Organization Name (eg, company) []:au-team.irpo
Organizational Unit Name (eg, section) [1:.
Common Name (e.g. server FQDN or YOUR name) []:docker.au-team.irpo
Email Address []:
Подписываем запросы

openssl x509 -req -in web.au-team.irpo.csr -CA ca.cer -CAkey ca.key -CAcreateserial -out web.au-team.irpo.cer -days 30
openssl x509 -req -in docker.au-team.irpo.csr -CA ca.cer -CAkey ca.key -CAcreateserial -out docker.au-team.irpo.cer -days 30
ISP Разрешаем доступ по ssh для root

sed -i 's/#PermitRootLogin without-password/PermitRootLogin yes/g' /etc/openssh/sshd_config
systemctl restart sshd
HQ-SRV Передаём необходимые файлы на ISP:

scp web.au-team.irpo.key root@172.16.1.1:~/
scp web.au-team.irpo.cer root@172.16.1.1:~/
scp docker.au-team.irpo.key root@172.16.1.1:~/
scp docker.au-team.irpo.cer root@172.16.1.1:~/
ISP

mkdir /etc/nginx/ssl
cp web.au-team.irpo.* /etc/nginx/ssl
cp docker.au-team.irpo.* /etc/nginx/ssl
curl -o /etc/nginx/sites-available.d/default.conf https://raw.githubusercontent.com/DenTret/demo2026/refs/heads/main/reverse-proxy-ssl.conf
apt-get update && apt-get install -y openssl-gost-engine
control openssl-gost enabled
nginx -t
systemctl restart nginx
HQ-SRV

cp ca.cer /raid0/nfs/
HQ-CLI

cp /mnt/nfs/ca.crt /etc/pki/ca-trust/source/anchors/
update-ca-trust
Проверяем наличие сертификатов в браузере Яндекс. Для этого заходим в браузер, открываем настройки и находим пункт "управление сертификатами". В нем выбираем пункт "Центры сертификации", должно быть вот так:

au-team.irpo
	hq-srv.au-team.irpo
The ministry of Digital Development and Communications
	Russian Trusted Root CA
	Russian Trusted Sub CA
Далее нужно установить КриптоПро CSP. Заходим на сайт: cryptopro.ru. Нажимаем на вкладку "Продукты" и находим нужный вариант. Нажимаем кнопку "Скачать" Заполняем данные:

ФИО: Иванов Иван Иванович
Email: admin@au-team.irpo
Организация: au-team.irpo
Отмечаем оба пункта ниже
Нажимаем на "Выбрать другой вариант" и выбираем пункт "Linux x64 RPM"
Нажимаем кнопку "Скачать"
После загрузки файла переходим в папку загрузки и распаковываем архив. Нажимаем по созданной папке правой кнокой мыши и выбираем пункт "Открыть в терминале".

su
apt-get update && apt-get install -y cryptopro-preinstall
./install_gui.sh
Откроется интерфейс установщика. Следуем инструкциям:

Жмём "Далее"
Выбираем пункты: "Криптопровайдер КС1", "Графические диалоги", "cptools", "Браузерный плагин", "Библиотека PKCS", "Импортировать сертификаты"
Жмём "Установить"
После окончания установки жмём "Позже"
Выходим из установщика
ПРОВЕРКА

Заходим на сайты:
https://web.au-team.irpo
https://docker.au-team.irpo
Задание 3: настройка ip-туннеля HQ-RTR
apt-get update && apt-get install -y strongswan mc
mcedit /etc/strongswan/ipsec.conf
config setup
    uniqueids = yes
    charondebug="ike 2, knl 2, cfg 2, mgr 2, chd 2"
conn br-rtr.au-team.irpo
    type=transport
    left=172.16.1.10
    leftid=172.16.1.10
    right=172.16.2.10
    rightid=172.16.2.10
    authby=secret
    ike=aes256-sha256-modp2048!
    esp=aes256-sha256!
    keyexchange=ikev2
    ikelifetime=24h
    lifetime=8h
    dpddelay=30
    dpdtimeout=120
    dpdaction=restart
    auto=start
mcedit /etc/strongswan/ipsec.secrets
172.16.1.10 172.16.2.10 : PSK "123qweR%"
systemctl start ipsec
systemctl enable --now strongswan-starter
BR-RTR

apt-get update && apt-get install -y strongswan mc
mcedit /etc/strongswan/ipsec.conf
config setup
    uniqueids = yes
    charondebug="ike 2, knl 2, cfg 2, mgr 2, chd 2"
conn hq-rtr.au-team.irpo
    type=transport
    left=172.16.2.10
    leftid=172.16.2.10
    right=172.16.1.10
    rightid=172.16.1.10
    authby=secret
    ike=aes256-sha256-modp2048!
    esp=aes256-sha256!
    keyexchange=ikev2
    ikelifetime=24h
    lifetime=8h
    dpddelay=30
    dpdtimeout=120
    dpdaction=restart
    auto=start
mcedit /etc/strongswan/ipsec.secrets
172.16.2.10 172.16.1.10 : PSK "123qweR%"
systemctl start ipsec
systemctl enable --now strongswan-starter
Проверка BR-RTR

apt-get install -y tcpdump
tcpdump -i enp7s1 -n esp
HQ-RTR

ping 172.16.2.10


2 Вариант настройки

На HQ-RTR  и BR-RTR
Apt-get update && apt-get install strongswan -y

BR-RTR
vim /etc/strongswan/swanctl/conf.d/gre.conf
	connections {
    gre {
        local_addrs = 172.16.2.2
        remote_addrs = 172.16.1.2
        local {
            auth = psk
        }
        remote {
            auth = psk
        }
        children {
            esp {
                local_ts = 172.16.2.2/32[gre]
                remote_ts = 172.16.1.2/32[gre]
                mode = transport
                start_action = trap
            }
        }
    }
}
secrets {
    ike {
        secret = "TunnelSecretKey123"
    }
}

systemctl enable --now strongswan && swanctl --load-all

HQ-RTR
vim /etc/strongswan/swanctl/conf.d/gre.conf
	connections {
    gre {
        local_addrs = 172.16.1.2
        remote_addrs = 172.16.2.2
        local {
            auth = psk
        }
        remote {
            auth = psk
        }
        children {
            esp {
                local_ts = 172.16.1.2/32[gre]
                remote_ts = 172.16.2.2/32[gre]
                mode = transport
                start_action = trap
            }
        }
    }
}
secrets {
    ike {
        secret = "TunnelSecretKey123"
    }
}

systemctl enable --now strongswan && swanctl --load-all
Задание 4: настройка межсетевого экрана HQ-RTR
apt-get install -y curl dos2unix
curl -o /etc/nftables.conf https://raw.githubusercontent.com/DenTret/demo2026/refs/heads/main/hq-rtr_nftables.conf
dos2unix /etc/nftables.conf
ipsec status
BR-RTR

apt-get install -y curl dos2unix
curl -o /etc/nftables.conf https://raw.githubusercontent.com/DenTret/demo2026/refs/heads/main/br-rtr_nftables.conf
dos2unix /etc/nftables.conf
ipsec status


2 вариант настройки

hq-rtr, br-rtr
apt-get install nftables -y
vim /etc/nftables/nftables.nft
	flush ruleset
	table ip filter {
    	chain forward {
        	type filter hook forward priority 0; policy drop;
        	ct state established,related accept
        	iifname != "enp0s3" oifname "enp0s3" tcp dport { 80, 443, 53 } ct state new accept
        	iifname != "enp0s3" oifname "enp0s3" udp dport { 53, 123 } ct state new accept
        	iifname != "enp0s3" oifname "enp0s3" ip protocol icmp accept
   	 }
    	chain input {
        	type filter hook input priority 0; policy drop;
        	iifname "lo" accept
        	ct state established,related accept
        	iifname "enp0s3" ip protocol icmp accept
        	iifname "gre1" ip protocol ospf accept
        	ip protocol esp accept
        	udp dport { 500, 4500 } accept
    	}
    	chain output {
        	type filter hook output priority 0; policy accept;
    	}
	}

nft -f /etc/nftables/nftables.nft && systemctl restart nftables
Задание 5 HQ-SRV
apt-get install -y cups cups-pdf
systemctl enable --now cups
cupsctl --share-printers --remote-any
systemctl restart cups
HQ-CLI

apt-get install -y cups system-config-printer
mcedit /etc/hosts
192.168.1.10 hq-srv.au-team.irpo hq-srv
Открываем пуск и пишем Параметры печати
Жмём добавить и в строке URL вводим http://192.168.1.10:631/printers/PDF
Жмём далее и снова далее, находим драйвер Generic CUPS-PDF
Снова жмём далее и применяем настройки
Появиться уведомление о печати
Задание выполнено
Задание 6 HQ-SRV
apt-get update && apt-get install -y rsyslog
mcedit /etc/rsyslog.d/00_common.conf
Расскоментируем модули imuxsock и imklog, а также модуль imtcp. Также после модулей надо добавить строку ниже

authpriv.* /var/log/auth.log
Данные строки добавляем в конец файла

$template RemoteLogs, "/opt/%HOSTNAME%/rsyslog.txt"
*.* ?RemoteLogs
& stop
systemctl enable --now rsyslog
systemctl start rsyslog
systemctl restart rsyslog
HQ-RTR, BR-RTR

apt-get update && apt-get install -y rsyslog
mcedit /etc/rsyslog.d/00_common.conf
Расскоментируем все 4 модуля

*.* @@hq-srv.au-team.irpo:514
*.warning @@192.168.1.10:514
systemctl enable --now rsyslog
systemctl start rsyslog
systemctl restart rsyslog
BR-SRV

apt-get update && apt-get install -y rsyslog
mcedit /etc/rsyslog.d/00_common.conf
Расскоментируем все 4 модуля

*.warning @@192.168.1.10:514
systemctl enable --now rsyslog
systemctl start rsyslog
systemctl restart rsyslog
Проверка BR-SRV

logger -p user.info “Test info”
logger -p user.warning “Test warning”
logger -p user.error “Test error”
HQ-SRV

cat /opt/br-srv/rsyslog.txt
Настройка ротации логов

mcedit /etc/logrotate.d/rsyslog
/var/log/syslog
/var/log/mail.log
/var/log/kern.log
/var/log/auth.log
/var/log/user.log
/var/log/cron.log
{
	rotate 4
	weekly
	missingok
	notifempty
	compress
	delaycompress
	sharedscripts
	postrotate
		/usr/lib/rsyslog/rsyslog-rotate
	endscript
}
/opt/*/rsyslog.txt {
	weekly
	minsize 10M
	compress
	missingok
	notifempty
	create 0644 root root
	rotate 4
}


2 Вариант настройки

HQ-SRV
apt-get install rsyslog -y
vim /etc/rsyslog.conf
	module(load="imudp")
	input(type="imudp" port="514")
	$template RL,"/opt/%HOSTNAME%/%PROGRAMNAME%.log"
	if $syslogseverity <= 4 and $fromhost-ip != '127.0.0.1' then ?RL
systemctl enable --now rsyslog && systemctl restart rsyslog
vim /etc/logrotate.conf
	/opt/**/*.log {
	weekly
	compress
	minsize 10M
	}

HQ-RTR, BR-RTR, BR-SRV
apt-get install rsyslog -y
echo "*.warning @192.168.100.2:514" >> /etc/rsyslog.conf
systemctl enable --now rsyslog
systemctl restart rsyslog
Задание 7 HQ-SRV
apt-get update && apt-get install -y postgresql17-server zabbix-server-pgsql fping
/etc/init.d/postgresql initdb
systemctl enable --now postgresql
su - postgres -s /bin/sh -c 'createuser --no-superuser --no-createdb --no-createrole --encrypted --pwprompt zabbix'
su - postgres -s /bin/sh -c 'createdb -O zabbix zabbix'
rpm -ql zabbix-common-database-pgsql | grep schema.sql # Заменить * на результат
su - postgres -s /bin/sh -c 'psql -U zabbix -f /usr/share/doc/zabbix-common-database-pgsql-*/schema.sql zabbix'
su - postgres -s /bin/sh -c 'psql -U zabbix -f /usr/share/doc/zabbix-common-database-pgsql-*/images.sql zabbix'
su - postgres -s /bin/sh -c 'psql -U zabbix -f /usr/share/doc/zabbix-common-database-pgsql-*/data.sql zabbix'
apt-get install apache2 apache2-mod_php8.2 -y
systemctl enable --now httpd2
apt-get install -y php8.2 php8.2-mbstring php8.2-sockets php8.2-gd php8.2-xmlreader php8.2-pgsql php8.2-ldap php8.2-openssl
mcedit /etc/php/8.2/apache2-mod_php/php.ini
memory_limit = 256M
post_max_size = 32M
max_execution_time = 600
max_input_time = 600
date.timezone = Asia/Yekaterinburg
always_populate_raw_post_data = -1
systemctl restart httpd2
mcedit /etc/zabbix/zabbix_server.conf
DBHost=localhost
DBName=zabbix
DBUser=zabbix
DBPassword=P@ssw0rd
systemctl enable --now zabbix_pgsql
apt-get install -y zabbix-phpfrontend-apache2 zabbix-phpfrontend-php8.2
ln -s /etc/httpd2/conf/addon.d/A.zabbix.conf /etc/httpd2/conf/extra-enabled/
systemctl restart httpd2
chown apache2:apache2 /var/www/webapps/zabbix/ui/conf
В браузере перейти на страницу установки Zabbix сервера:
http:///zabbix
Войдя в систему, нужно сменить пароль пользователя (Administration ⇾ Users), завести других пользователей и можно начать настраивать Zabbix.
HQ-SRV

apt-get update && apt-get install -y zabbix-agent
mcedit /etc/zabbix/zabbix_agentd.conf
Server=127.0.0.1
ServerActive=127.0.0.1
Hostname=zabbix_server
systemctl enable --now zabbix_agentd.service
HQ-RTR, BR-RTR, BR-SRV

apt-get update && apt-get install -y zabbix-agent
mcedit /etc/zabbix/zabbix_agentd.conf
Server=192.168.1.10
ServerActive=192.168.1.10
#Hostname=
systemctl enable --now zabbix_agentd.service
После настройки возвращаемся в веб-интерфейс Zabbix и жмём кнопку "Создать узел"
В появившемся окне добавляем следующие настройки:
Имя узла: <имя_машины>
Шаблоны: <Нажимаем кнопку выбрать, ввыбираем раздел operating system и в нем выбираем пункт Linux by Zabbix agent
Группы узлов: Zabbix server или Linux Server
Интерфейс:

2 Вариант настройки

HQ-SRV
echo "192.168.100.2 mon.au-team.irpo" >> /etc/hosts
systemctl restart dnsmasq
apt-get install -y zabbix-common-database-mysql
mysql -uzabbix -pzabbix zabbix < /usr/share/doc/zabbix-common-database-mysql-*/schema.sql
systemctl enable --now zabbix-server
Задание 8 BR-SRV
mkdir /etc/ansible/PC_INFO
apt-get update && apt-get install -y dos2unix curl
curl -o /etc/ansible/inventory.yml https://raw.githubusercontent.com/DenTret/demo2026/refs/heads/main/inventory.yml
dos2unix /etc/ansible/inventory.yml
Проверка:

ansible-playbook /etc/ansible/inventory.yml
cd /etc/ansible/PC_INFO


2 Вариант настройки

BR-srv
mkdir -p /mnt/iso
mount /dev/cdrom /mnt/iso
mkdir -p /etc/ansible/PC-INFO
cp /mnt/iso/playbook/*.yml /etc/ansible/inventory_playbook.yml
apt-get update && apt-get install -y sshpass
vim /etc/ansible/hosts
[inventory_hosts]
HQ-SRV ansible_host=192.168.100.2 ansible_user=root ansible_port=2026 ansible_password=P@ssw0rdted
HQ-CLI ansible_host=192.168.200.4 ansible_user=user ansible_port=2026 ansible_password=resu
ansible-playbook /etc/ansible/inventory_playbook.yml
Задание 9 HQ-SRV
sudo apt-get update && sudo apt-get install -y fail2ban python3-module-systemd
sed -i 's/#SyslogFacility AUTHPRIV/SyslogFacility AUTHPRIV/g' /etc/openssh/sshd_config
sed -i 's/#LogLevel INFO/LogLevel INFO/g' /etc/openssh/sshd_config
sudo systemctl enable --now fail2ban
sudo systemctl start fail2ban
sudo systemctl status fail2ban
mcedit /etc/fail2ban/jail.d/ssh.conf
[DEFAULT]
# Время бана в секундах (1 минута)
bantime = 60
# Окно поиска нарушений (10 минут)
findtime = 600
# Максимальное количество попыток
maxretry = 3
[sshd]
enabled = true
port = 2026
filter = sshd
logpath = /var/log/auth.log
backend = %(sshd_backend)s
systemctl restart fail2ban
Проверка: ISP
ssh sshuser@172.16.1.10 -p 2026
Вводим 3 раза неправильно пароль при подключении к ssh, должен быть отказ подключения. HQ-SRV
fail2ban-client status sshd
Должны увидеть заблокированные айпи и количество атак.
2 Вариант настройки
HQ-SRV
apt-get update && apt-get install -y fail2ban
vim /etc/fail2ban/jail.local
[sshd]
enabled = true
port = 2026
maxretry = 3
bantime = 60
backend = systemd
systemctl enable --now fail2ban && systemctl restart fail2ban